Getting a fantastic vocal recording requires the right equipment and the right technique. Pay close attention to these simple tips and you’ll not only improve the sonic quality of your recordings, you’ll also improve the way you express yourself vocally.
Tip 1. Choose a microphone that was designed for voice recording
As mentioned in this article, Choosing a Microphone, not all microphones are suitable for recording voiceovers. You really must use the right type of microphone if you are intent on capturing a professional quality sound.
Tip 2. Use a microphone windshield
Without a microphone windshield you will probably ruin your recording with “plosives”. Plosives are small blasts of air that escape from between your lips while you are speaking.
Many microphones come with a soft foam windshield that covers the head of the microphone. These do provide some protection from plosives, but in many cases they are insufficient, especially when you’re up close to your microphone while recording spoken words. You will need a standalone nylon windshield like the one shown here:
This type of microphone windshield is constructed of a sheath of nylon material that is stretched over a circular frame. These windshields provide an air buffer between you and the microphone and will completely eliminate plosives.
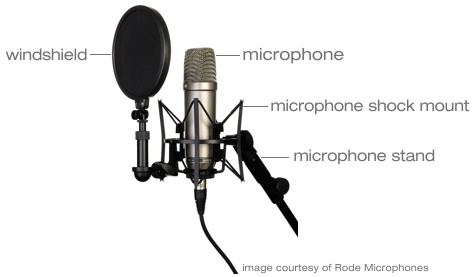
D.I.Y Tip: It is possible to create a makeshift windshield by stretching a nylon stocking over a coat hanger. Open the coat hanger out so that it offers you a large surface area and then tape the windshield to your microphone stand. It might not be pretty, but it will be 75% as effective as a professional windshield.
Tip 3. Silence is golden
Microphones are very sensitive and will pick up all the ambient sounds around you, not just your voice! The sound of your computer humming, the sound of the traffic outside, the sound of your air conditioning unit – these are all examples of sounds that can ruin a good recording. Your microphone will record the sound of your chair creaking, the sound of your necklace jingling and even the sound of your stomach grumbling if you don’t address these sounds in advance.
You can eliminate many of these problems by:
a. Moving as far away from your computer as possible, and/or using some pillows or furniture as baffles to muffle the sound that it emits (be careful not to block all the air vents in your computer’s case for too long. Without airflow your computer can overheat. Nasty problems may ensue!)
b. If external noises are a problem, relocate yourself to a more quiet location, or record late at night when the hubbub of the world has died down.
c. Remove any jingly jewellery and/or “swishy” clothing. Either that or you’ll have to master the art of sitting VERY still.
Professional recording studios usually use isolation booths for vocal recordings. These “silent spaces” are ideal for recording, but you can still capture a good quality recording at home provided that you take every reasonable measure to eliminate ambient noises.
Tip 4. Check your levels
One of the most common mistakes that people make when recording their voice is recording either too quietly or too loud. It’s essential that your recording signal is reasonably strong, but does not exceed the maximum volume allowed by your recording software (a problem referred to as “digital clipping”). You’ll need to understand how to use the volume/gain controls of your particular recording setup in order to ensure that a good strong signal reaches your computer, without clipping.
If your voice has been recorded too quietly, then you’ll find yourself compensating for this by adding loads of volume after it has been recorded. Doing so will cause any other ambient background noises to become louder too.
If your voice recording is too loud, then you’ll hear distortion. This must be absolutely avoided.
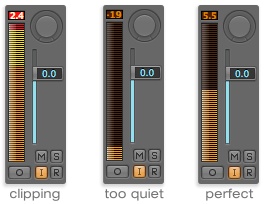
Do some test recordings and watch the level meters on your recording software. Aim for a maximum volume of around 5-6 decibels below maximum at the loudest point in your recording.
Tip 5. Perfect position
A good starting point for microphone placement is to sit or stand with your mouth approximately 6-12 inches from the head of the microphone.
Getting nice and close to your mic (6 inches or even less) can give you a really nice intimate sound, but be very careful. Most voiceover microphones experience what is known as the “proximity effect” and can result in an overly bassy sound if you get too close.
Standing too far away will make your voice sound a little thin and will also allow more ambient background noises to sneak into your recording.

Try to keep relatively still (if possible). If you are recording at a close distance, even small shifts in your position can make a dramatic difference to the sound. If you move around a lot then the volume and tonality of your recording will constantly change, making your performance sound unnatural.
Tip 6. Relate to your listener
While you are recording yourself speaking, do your best to imagine that the microphone is a real person and that you are speaking directly to them. Talk as if you were relating to a friend, rather than as someone who is reading from a script.
It’s so important to master the art of speaking naturally, or you’ll end up sounding robotic and stilted. Express your emotions. Have an opinion. Get your point across. Relax and be the real you, speaking fluently to another real person in this moment.
Remember – you are not practicing dictation, you are just having a very one-sided conversation with someone who cares about what you have to say.
Further reading (highly recommended)
Much more in depth information on this subject is available in the free eBook, “How to Create Professional Hypnosis & Meditation Recordings”. It’s available from our parent website (Enlightened Audio) via the following link: https://www.enlightenedaudio.com/how-to-create-professional-hypnosis-and-meditation-recordings